Showing posts with label silver. Show all posts

Thursday, June 5, 2014

Metallic Fishtails

The fishtail pattern is a really fun and easy way to add extra color into your manicure.


See what colors I used and more pictures after the jump!

Thursday, October 31, 2013

Halloween 2013: Starfire Nail Art

Happy Halloween! I was going to post a Halloween-themed manicure today, but my Macbook's SD card drive has decided not to work and thus the pictures are now trapped in a weird limbo. I'll show that to you as soon as I solve that problem, but in the meantime, I have the nail art I'm wearing to go with my costume for this year! So it's still Halloween themed. Sorta.

Anyway, this year, I'm being Starfire! She's an alien princess superhero from the DC universe. She appears in the comics, but my costume is based on the popular cartoon, Teen Titans (not her comic book counterparts - those costumes show WAY too much skin for me!). I was/am obsessed with that show, and this year, my friend and I decided to dress up as characters from the cartoon. She's being Raven. We made our costumes by hand, which in retrospect was an insane idea. I can hardly sew, but I managed to create Starfire's entire outfit by hand! I haven't had a chance to take a lot of pictures yet (which is why I wanted to post this manicure later), but you can get the gist of the costume from the picture I've included at the end of the post.


Okay, so after that long introduction, here's the nail art! Starfire's powers include shooting bright green starbolts from her hands, so I did a manicure that was mostly a bright green. I also wanted to give a nod to her alien heritage by adding some futuristic detailing.


I started with a base of China Glaze in White on White so the neon would really pop. I layered China Glaze I'm With the Lifeguard over that, which is a great, shimmery neon green. Then I added a coat of China Glaze Fairy Dust for some tiny holographic sparkles. I let all of that dry, and then used a striper brush and Sephora by OPI Queen of Everything to freehand the striped pattern. I added purple rhinestones for a pop of contrast (and to match the purple of her outfit).


I'm pretty pleased with how these came out. They're super bright, and my freehanding skills are definitely improving. Even my right hand doesn't look bad!


Here's my costume! Starfire has really bright green eyes, so I used makeup to show that. I really wanted to use colored contacts, but sadly, my eyesight is absolutely awful so buying a pair of green contacts in my prescription would have been too expensive to justify. But I'm really proud of myself! I think the costume came out really well (especially since this is the first time I've attempted to make any sort of clothing). I also have really long boot covers on my legs, but you can't see those here. But trust me, the whole effect is really great.

I hope you all have a really awesome Halloween!

Tuesday, October 1, 2013

Purple Waterfall Stripes

The Nailasaurus has been doing some super cool things with what she calls waterfall stripes - and I decided to imitate her fabulous idea! Surprisingly, this mani is super easy to do.


I started by painting my nails with a base of Essie Bond With Whomever, a lavender creme. The formula was actually a bit runny for my taste.


After that, I took a striper brush and painted on some random, messy stripes of Essie Sexy Divide, a deep purple shimmer. I let that dry, then I added some stripes of Sephora by OPI in Queen of Everything.


Speaking of Sephora by OPI, I got really sad when I found out that Sephora was discontinuing that whole line in favor of something new, so I bought two back ups of Queen of Everything! It's literally the perfect silver; I am totally not being crazy. It's one of the first polishes I bought, actually - I got it to go with my junior prom dress, haha! Seems like so long ago.


But anyway, that's all it takes to make this gorgeous mani! Just some freehanded, messy stripes :) I'll definitely be doing this design again.

Wednesday, August 7, 2013

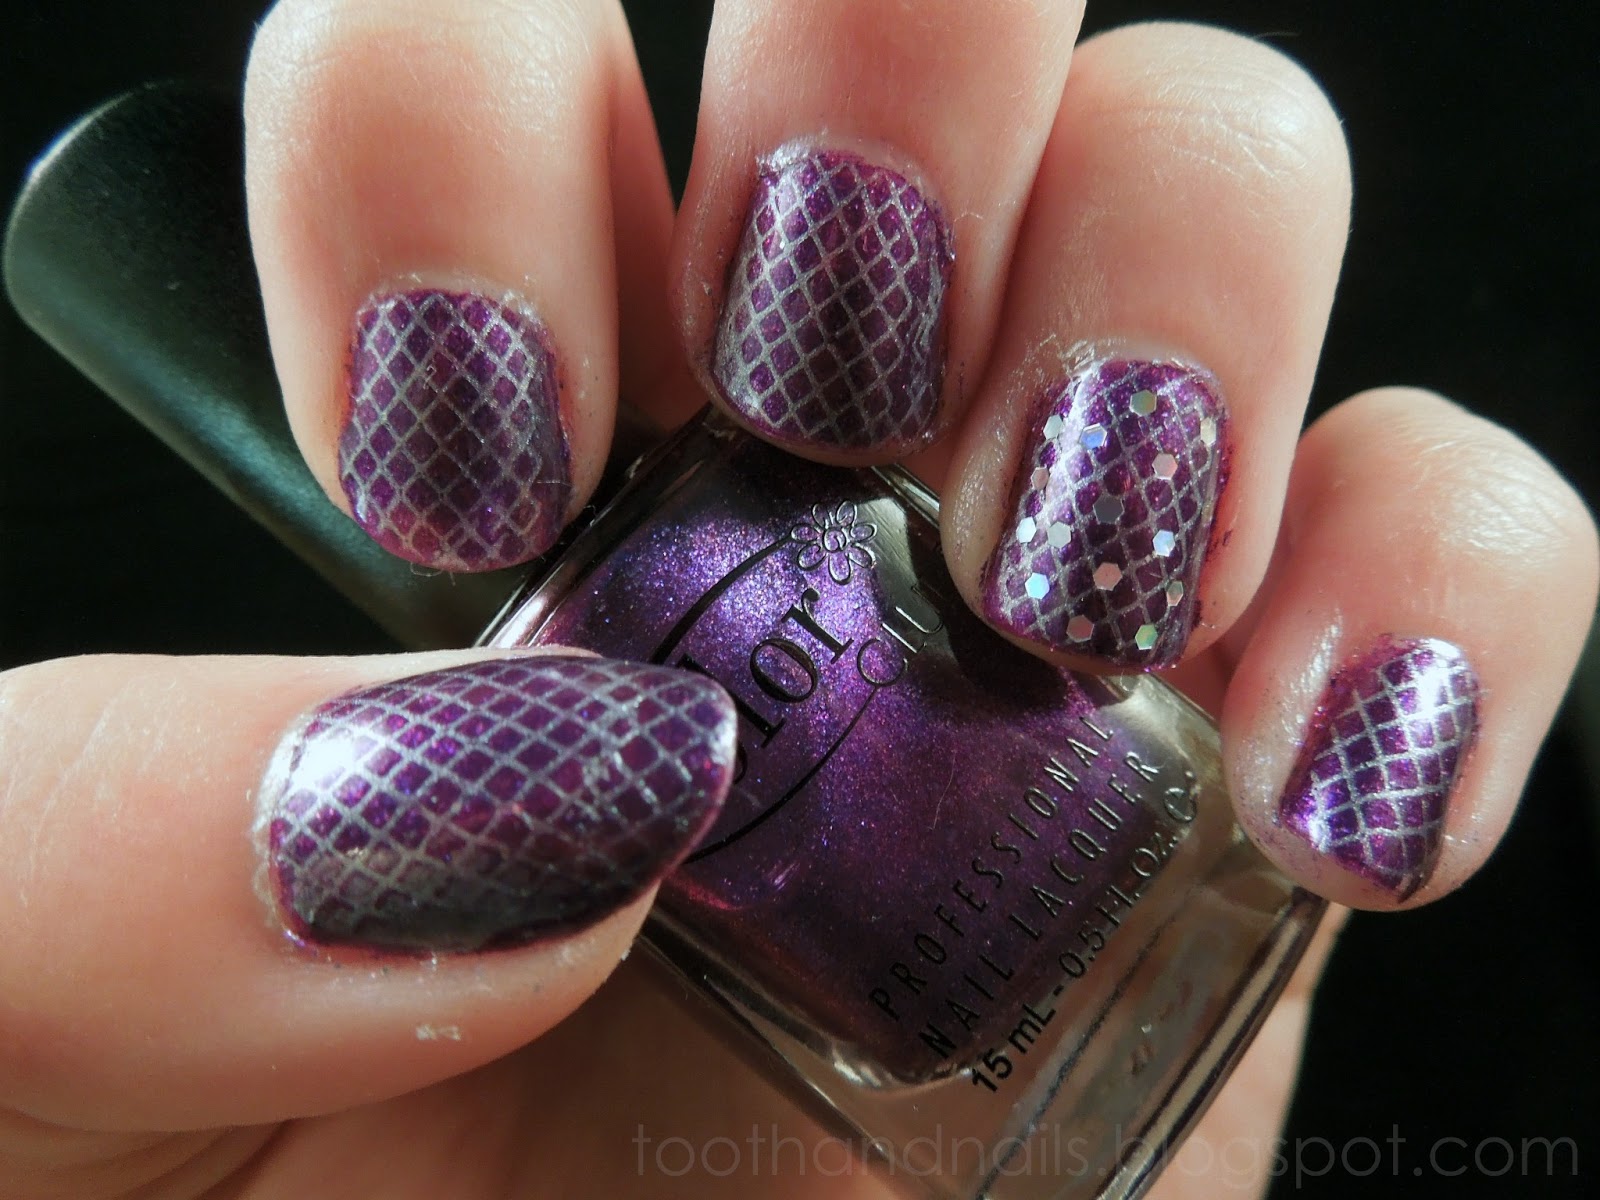
Silver Fishnet Stamping and Glequins

Stamping is not one of my strongest nail art skills, so I try to practice when I have the time (and patience). But sometimes I think that just a plain stamped mani needs a little extra something, and that's how today's nail were born!


I started with two coats of Glitter Wonderland by Color Club, a sparkly purple. Then I used Konad Special Polish in Silver to stamp a fishnet design onto each nail. I wanted a little extra oomph, so I added some silver holographic glequins to my ring fingers. For those of you who don't know, a glequin is a glitter-sequin type thing, and I got mine from the Born Pretty Store.


I think the glequins give this mani the extra sparkle it needed!

Tuesday, July 23, 2013

The Last of England: Berry + Silver Glitter Triangles

I am a bad blogger and haven't even finished posting all the manis I have from England! I've just been really busy this summer between my internship and working at my family's pharmacy, so I haven't been posting as much as I'd like to. But anyway, here's the last of my poorly lit abroad manicures!


I started with a base of Barry M Gelly Hi Shine in Pomegranate. Then I let that dry and taped off the triangles. I used Milani One Coat Glitter in Silver Dazzle for the triangles. I sealed it all with a coat of Seche Vite, as usual.


I really like the Gelly Hi Shine line; too bad we don't have Barry M in the US!


Now that I'm all done with manis from abroad, you can expect much better lit photos once again :)

Tuesday, May 21, 2013

Half and Half: Dots and Glitter

Sorry I've been so sporadic with posting! My semester ended recently and then we took a trip to Dublin, so it's been pretty hectic around here. I'm off to Berlin and Amsterdam for the week too, but I have posts scheduled for that time :)

Anyway, today I have another nail art rut design. I couldn't decide what to do, so I dug around my basket of polish until something jumped out at me.


I started with a base of Sephora by OPI Queen of Everything. Then I freehand painted half of my nails with Deborah Milano 99. I used a dotting tool and 99 to add dots to the silver half of my nails. It still didn't feel complete, so I added a layer of Models Own Freak Out to the blue half of my nails.


I don't usually like shard glitter that much, but Freak Out is such a fun polish.


I got out of this nail art rut pretty quickly, thank goodness :) Check back soon for another Throwback Thursday!

Friday, May 10, 2013

Harry Potter Nail Art: Revisited (Plus Hogwarts Crest Tutorial)

Sorry for the lack of posts lately! I've had a really busy week. On Monday and Tuesday I was in London, then Wednesday was my 21st birthday! Thursday was a bit of a recovery day, haha. But anyway, I'm really excited about the nail art I have to show you today.

On Tuesday, my friends and I went to the Warner Brothers Harry Potter Studio Tour! I am a HUGE Harry Potter fan, so I knew I had to do some nail art for the occasion.


This post is pretty picture heavy, so you can see the rest (and the tutorial) after the jump!

Thursday, April 25, 2013

Throwback Thursday: Neon Tape Decals

Happy Throwback Thursday! Today I have a really cool mani I did a looong time ago. It took a lot of time and patience, but I really like how it came out. It involves tape decals.


Tape decals are created by painting nail polish onto a piece of clear tape, letting it dry, and then cutting the tape into shapes or stripes. Then you just stick them on your nail! You have to add topcoat to seal them on, but honestly it's really pretty easy, just a little time consuming.


For a base color I used my favorite silver, Sephora by OPI in Queen of Everything. I can't remember what colors I used for the decals - a bunch of China Glaze and Sinful Color neons, I believe.

I should try another tape decal mani sometime soon!

Thursday, April 18, 2013

Throwback Thursday: Blue and Silver

Welcome to another Throwback Thursday! Today, I have a mani featuring a really lovely blue polish: China Glaze Frostbite. I started with two coats of that, then used a makeup sponge to add a gradient of Happy Anniversary! by OPI.


I think my gradient skills have improved since this mani, don't you?

Thursday, April 4, 2013

Throwback Thursday: Explosion Accent Nail

Welcome back to Throwback Thursday! Today I have a really cool accent nail that I really need to try again: the explosion.


I think this manicure is really fun! I always get really frustrated when I used tape though...I'm always messing up the base color because I'm too impatient to let it dry all the way. Oh well. For the accent, I cut out triangles of tape and carefully layered them over the base color. I painted the black and let that dry, and then I inched those same tape triangles up a bit and painted over the black with the silver. Seal with a top coat and voila!

I used China Glaze in Turned Up Turquoise for most of my nails. The accent nail is China Glaze in Purple Panic, black is Sally Hansen Xtreme Wear in Black Out and Milani 3D Holographic in HD for the silver.

Tuesday, January 15, 2013

Snowflake Glitter Gradient

Sorry for the delay in posting, but I've been quite busy the past few days. Today, I arrived in Sheffield, England! I'll be spending a semester abroad at Sheffield Hallam University, so it's been a really crazy week of preparation and travel for me. I'm really tired since I didn't sleep on the plane (essentially pulling an all-nighter), but I'm excited and really glad to be relaxing in my new apartment right now. Obviously, since I'm abroad, I won't have my full collection of nail polish with me for the next few months. I have a decent amount with me, so I hope to post as often as possible :)

Anyway, on to the polish.

I haven't really seen any snow so far this winter (until this morning when I arrived in England), so I elected to put some on my nails instead!


I started with a base of China Glaze Blue Bells Ring, a pretty blue with a silver shimmer/frost. Then I used a snowflake design from a Bundle Monster plate (I forget which one!) and used Konad Special Polish in White to stamp a snowflake onto each nail. I wanted to place them a bit randomly, but the snowflakes were rather large. Then I used a makeup sponge to add a gradient of China Glaze Glistening Snow. To make the gradient a bit smoother, I used China Glaze Fairy Dust, which is essentially just a less dense version of Glistening Snow. Yay holo glitter!


I'm really proud of how well the stamping came out! I'm usually not too good at it.


And that's all for today :)

Monday, October 22, 2012

Day 8: Metallic

Day 8's theme is metallic! I decided to do a metallic dot gradient.


Oddly enough, all of the polishes I used for this mani are Sephora by OPI. I started with a base of Queen of Everything, which is one of my favorite polishes. I've put a pretty big dent in the bottle, so you can tell I really like it! It covers perfectly in just one coat.


Then I used a large dotting tool to add some dots of Rumba Romance, a metallic brown. I switched to a smaller dotting tool about a third of the way up my nails. I repeated the steps with Tempted by Teal. To seal it up, I used a coat of Seche Vite.


I liked this mani! Queen of Everything is just so lovely and perfect, and polka dots are always fun.

The next day's theme is rainbow!

Tuesday, August 28, 2012

Chrome and Rainbow Polka Dots!

Classes started up for me yesterday, so I decided to do some fun nail art for the first day of school. A little bit of rainbow never hurt anyone!


I started with a base of No Place Like Chrome by Essie. I had seen a good review of this polish, but I did not like the formula on this one. It was streaky and a bit thick, and if I painted over an area, the brush would pull the polish and create bald spots. Maybe some polish thinner will help it out?

Please excuse my bandages...I had an unfortunate run in with a thorn bush!
I grabbed a dotting tool and added some rainbow polka dots to the silver to make this mani more fun. Here are the colors used:

Turquoise: Turned Up Turquoise (China Glaze)

Pink: Oh Cabana Boy (ORLY)
Green: Fresh (ORLY)
Purple: Grape Pop (China Glaze)
Orange: Sun Kissed (Sally Hansen Xtreme Wear)


Having a cute design on my nails always cheers me up. If I have to wake up at 8 in the morning for class, at least my nails are bright and happy!