Showing posts with label blue. Show all posts

Thursday, July 17, 2014

Penguins and Stripes (Plus Tutorial)

There is never a wrong time for cute animals. And even though it's summer, it's a perfect time to sport some wintery penguins on your nails!


I've included a tutorial for the penguin nail art after the jump, so read on!

Thursday, June 5, 2014

Metallic Fishtails

The fishtail pattern is a really fun and easy way to add extra color into your manicure.


See what colors I used and more pictures after the jump!

Monday, April 28, 2014

Blue and Olive Dotted French

French manicures were really popular in my area when I was growing up. I always thought they were a little boring, but I can definitely get behind more interesting variations on a plain French manicure. This one uses dots instead of the usual straight line.


Read more after the jump!

Wednesday, March 19, 2014

Elevation Polish Nararsuk + Contrast Gradient

I love color. I love making colors pop by layering them over contrasting colors, too! So that's what today's nail art is all about.


Look at that contrast. Black and white and orange and blue. I love it.


I started by making the gradient first. I used Au Champagne by ORLY, a shimmery white. Then I used a makeup sponge to dab on a gradient of Orange You Hot? by China Glaze, a neon orange.


I let the gradient dry, and then I added a coat of Nararsuk by Elevation Polish on top. Nararsuk is a really stunning glitter topper. It has black, turquoise, and blue glitters in a clear base. The glitters are matte and satin. There are hexes and squares in various sizes. It goes on so easily and is very glitter dense.


Elevation Polish can be purchased here; they restock on the 7th and 22nd of each month.

Sunday, March 16, 2014

Subtle Saturn Stamping

Last week was Carnegie Mellon's spring break, so sorry for the lack of posts! I went to San Juan, Puerto Rico with six of my friends. It was so much fun! And I got a little tan, too :)

Anyway, today I have a stamping manicure for you. I've gotten so much better at stamping since I've started, so it just goes to show that practice really does make perfect.


I started with a base of Butler Please by Essie. I let that dry, and then I used a Saturn image from the Cheeky Summer Collection stamping plates. I used Comic Fate by Color Club, an orange holo, for that stamping.


I really think the use of a credit card type object as a scraper has been the key to my success. Previously, I used a regular scraper and always had trouble getting it to scrape cleanly.


I really love stamping manicures, so look out for more in the future :)

Wednesday, March 5, 2014

Bronze and Blue Arrow

I'm a big fan of the clean lines of tape manicures, but usually I'm too impatient to wait for things to dry. But I had a lot of time on my hands when I decided to do this one.


I started with a base of the lightest color, the bronze-y orange gold NARS Kismet. I let that dry, then used two pieces of tape to make a downward arrow shape. The next layer was Milani One Coat Glitter in Blue Flash. I let that dry and used two more pieces of tape to layer on a coat of China Glaze Harvest Moon.


Top coat is key for a manicure like this -- it smooths everything out really well.


I really wish I had the patience to do these more often. They always come out so pretty!

Wednesday, January 8, 2014

Lime Crime Splits and Studs

So sorry I haven't posted in so long! Finals came along and I got really busy, but I'm back :) I'll try to stick to more regular posting again.

Today I have some fun nail art featuring the Lime Crime polishes again.


To do this mani, I started by painting all of my nails in the lighter of the two colors I would use. So for my thumb, I painted it entirely yellow, my pointer blue, etc. I let all of that dry.


I was lazy (oops) so I didn't use tape for this mani. I painted another Lime Crime color over half of each nail. Then I used some silver square studs from the Born Pretty store and put them in the center of each nail. Added some top coat, then we're done!


The colors I used were all Lime Crime:
Orange: Peaches <3 Cream
Yellow: Crema de Limon
Green: Pastelchio
Blue: Once in a Blue Mousse
Purple: Lavendairy


I really, really love the Lime Crime polishes!

Sunday, October 13, 2013

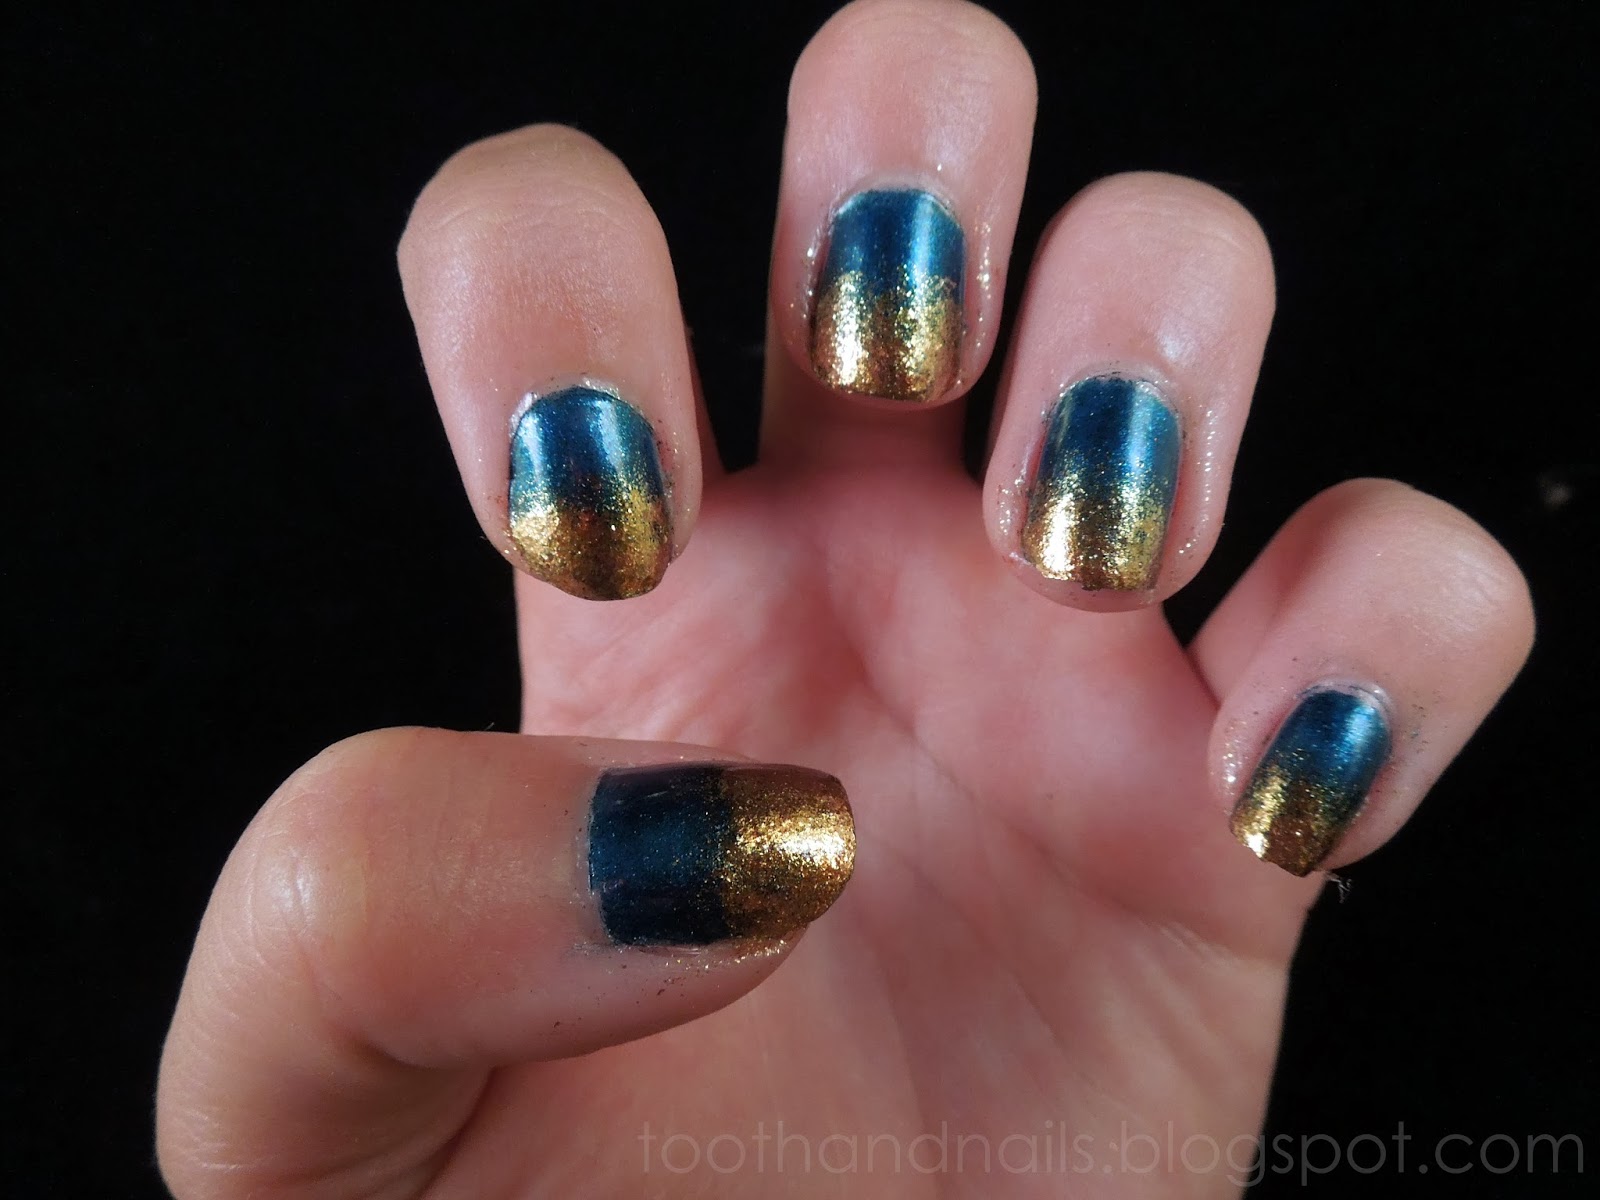
Blue Gold Gradient

Gradients are my go-to nail art when I feel like I'm in a rut. This time, I went for the classic color combo of blue and gold.


I started with a base of Bluey by Butter London, a shimmering deep blue. I let that dry, then used a makeup sponge and Goldeneye by OPI to create the gold gradient.


I can't say enough good things about Goldeneye - it's definitely becoming one of my favorite polishes!

Thursday, July 4, 2013

American Flag Nails

Happy 4th of July to everyone in the USA! In honor of this most patriotic holiday, I have some appropriately festive nail art.


My inspiration for today's nail was the American flag! To break it down, I'll start with my red-and-white striped nails. I started with a base of ORLY Au Champagne, a shimmery white. I used three coats to even everything out. I let that dry completely, then I used some striping tape and a thick coat of Milani One Coat Glitter in Red Sparkle. One thing I have to note is that I have two versions of Red Sparkle - one with gold glitter and one without. The latter is older than the gold glitter version, and it's the version I used here. I added a coat of Seche Vite to smooth things out.


Now for the star nails, I started with a base of ORLY Stone Cold, a beautiful shimmery blue. I let that dry, then I used Konad Special Polish in White and a Bundle Monster plate to stamp the star designs onto my nails. My stamping skills (while improving) are not the best, so I fixed any mistakes using White and a nail art brush. I let that dry, then I added a coat of Seche Vite.


I'm really excited that these came out so well! The stamping isn't 100% perfect, but you can only see the imperfections from close up.


Everyone at my internship loved my nails. Now we're having a good ol' American barbecue to celebrate Independence Day! Hopefully swimming doesn't ruin my nail art.

I hope you all have a great 4th of July!

Saturday, June 22, 2013

Nautical Skittles + Anchor Tutorial

I've been such a bad blogger lately! Sorry about that - I've been really busy with friends and my internship. I have a tutorial to make up for it :)


Nautical skittles! I really wanted to try out vertical lines, and it made me think of a nautical theme so I did an anchor accent as well. Here's the tutorial for how to freehand an anchor:


It's pretty straightforward, really.


For my thumb and middle finger, I used a base of China Glaze Sea Spray then topped it with two coats of Candeo Colors Divebomb. For my index finger and pink, I started with a base of OPI Goldeneye. I let that dry completely, then I used striping tape and China Glaze First Mate to create the vertical stripes.


For the anchor nail, I started with a base of China Glaze Turned Up Turquoise and used a makeup sponge to add a gradient of Goldeneye. I freehanded the anchor using First Mate and a striping brush. All of my nails are sealed with Seche Vite for smoothness and shininess :)


I really love how these turned out! Vertical stripes really appeal to me, and I think my accent nail is especially cute.

Sunday, June 9, 2013

Sticks 'n' Stones and Cotton Candy

Happy Sunday everyone! Sorry for the late post today; I may have gotten caught up in playing the new Animal Crossing game that came out today. (I'm an adult, I swear!) But anyway, I have some super awesome nail art for you today.


I had seen black and white glitter layered over a gradient before, and I absolutely loved how it looked. So that was my inspiration.


I started with a base of Sally Hansen Xtreme Wear in Bubblegum Pink. I let that dry, then I used a makeup sponge to add a gradient of Barry M Blueberry. Then I layered one coat of Ninja Polish Sticks 'n' Stones.


I really love how the black and white glitter looks with the pastel gradient. I'm totally in love with this manicure. The gradient reminds me of cotton candy colors, too. I used to love getting cotton candy when I went to hockey games as a kid.


Black and white glitter looks good over pretty much anything! I'll have to try it over more gradients.

Thursday, June 6, 2013

Throwback Thursday: Blurple Glitter Gradient

Hello everyone! It's good to be back on Eastern Standard Time. Today, I have another Throwback Thursday for you.


I used a base of Galaxy Girl by ORLY, then I used a makeup sponge to add a gradient of Blue Flash by Milani One Coat Glitter.

Thanks for reading!

Monday, June 3, 2013

Nautical/Patriotic Floral Print

Today, I have some accidentally patriotic nails for you. But they're extra appropriate because:

I'M HOME!

I returned from my semester abroad today, and I'm officially back in the good ol' USA. It's really been such a crazy, wonderful, eye-opening, unforgettable semester. The past four months have really flew by, and I am so grateful that I had the opportunity to study in England and travel throughout Europe. I've grown so much as a person, and I've made so many memories that I'll cherish for the rest of my life. I'm really, really going to miss it, but I'm also so happy to be home. So many emotions!

But anyway, nails:


I've seen a few combinations of stripes and floral that inspired me to do my own. I reached for some colors that I thought would work well together, and they just happened to be red, white, and blue! Nautical or patriotic; either way, it's a good color combo.


For the striped nails, I started with a base of China Glaze White on White. Then I used striper brushes to freehand stripes of First Mate, Hey Sailor, and Sea Spray, all by China Glaze. The lines aren't perfect, but I think they came out pretty well! The topcoat smudged my ring finger a bit, but oh well.


For the floral print nails, I started with a base of First Mate. Then I used a dotting tool to make the flowers using White on White, Sea Spray, and Hey Sailor. I used a smaller dotting tool to make the dots inside the flowers. For the leaves, I used a nail art brush to freehand them using Sea Spray.


I really like how these came out, imperfections and all. And it feels so good to be back in my home country :)