Showing posts with label orly. Show all posts

Wednesday, August 6, 2014

Orange and Turquoise Neon Leopard Print

Neons in summer is certainly nothing groundbreaking, but that doesn't stop them from being really fun. I absolutely love neon nail polish, and today's mani is a really fun color combo and print!


Read more after the jump :)

Wednesday, March 19, 2014

Elevation Polish Nararsuk + Contrast Gradient

I love color. I love making colors pop by layering them over contrasting colors, too! So that's what today's nail art is all about.


Look at that contrast. Black and white and orange and blue. I love it.


I started by making the gradient first. I used Au Champagne by ORLY, a shimmery white. Then I used a makeup sponge to dab on a gradient of Orange You Hot? by China Glaze, a neon orange.


I let the gradient dry, and then I added a coat of Nararsuk by Elevation Polish on top. Nararsuk is a really stunning glitter topper. It has black, turquoise, and blue glitters in a clear base. The glitters are matte and satin. There are hexes and squares in various sizes. It goes on so easily and is very glitter dense.


Elevation Polish can be purchased here; they restock on the 7th and 22nd of each month.

Thursday, July 11, 2013

Turquoise and Rose Gold Dots

Sometimes you just wanna do something simple. And when that urge strikes me, I usually go with some polka dots.


I dug around my collection for some polishes that would look pretty together and settled on Barry M Gelly Hi Shine in Greenberry and ORLY Rage.


I used Greenberry as the base for all of my fingers except my ring finger. I used a dotting tool to add dots of Rage, and did an inverted look on my ring finger for an accent nail.


I'm definitely a fan of this color combo!

Thursday, July 4, 2013

American Flag Nails

Happy 4th of July to everyone in the USA! In honor of this most patriotic holiday, I have some appropriately festive nail art.


My inspiration for today's nail was the American flag! To break it down, I'll start with my red-and-white striped nails. I started with a base of ORLY Au Champagne, a shimmery white. I used three coats to even everything out. I let that dry completely, then I used some striping tape and a thick coat of Milani One Coat Glitter in Red Sparkle. One thing I have to note is that I have two versions of Red Sparkle - one with gold glitter and one without. The latter is older than the gold glitter version, and it's the version I used here. I added a coat of Seche Vite to smooth things out.


Now for the star nails, I started with a base of ORLY Stone Cold, a beautiful shimmery blue. I let that dry, then I used Konad Special Polish in White and a Bundle Monster plate to stamp the star designs onto my nails. My stamping skills (while improving) are not the best, so I fixed any mistakes using White and a nail art brush. I let that dry, then I added a coat of Seche Vite.


I'm really excited that these came out so well! The stamping isn't 100% perfect, but you can only see the imperfections from close up.


Everyone at my internship loved my nails. Now we're having a good ol' American barbecue to celebrate Independence Day! Hopefully swimming doesn't ruin my nail art.

I hope you all have a great 4th of July!

Thursday, June 27, 2013

Throwback Thursday: Duochrome Gradient

Today's Throwback Thursday features one of my favorite nail art techniques: a gradient!


Space Cadet by ORLY is just a great color. Its weird purple-y green duochrome is so interesting! I noticed that Gleek Out by Sephora by OPI is a similar green to the green flash of Space Cadet, so I decided to do a gradient. I used Gleek Out for the base color and sponged Space Cadet on the tips with a makeup sponge. Simple, but pretty.

That's all for today!

Thursday, June 6, 2013

Throwback Thursday: Blurple Glitter Gradient

Hello everyone! It's good to be back on Eastern Standard Time. Today, I have another Throwback Thursday for you.

I used a base of Galaxy Girl by ORLY, then I used a makeup sponge to add a gradient of Blue Flash by Milani One Coat Glitter.

Thanks for reading!

Saturday, June 1, 2013

Saran Wrap Contrast

I've only tried the saran wrap (or plastic wrap, whatever you call it) technique once before, but I remember thinking it was really cool! So I decided to give it another go.


I wanted to use two colors that would really pop against each other, so I chose a bright neon and a dark creme. I started with a base of China Glaze White on White then layered two coats of ORLY Melt Your Popsicle over that. I let that dry completely.


When that was dry, I layered a coat of Barry M Indigo over one nail at a time, pressing a piece of crumpled plastic wrap against the coat of Indigo to remove some of the polish. And voila! Instant nail art.


I added some rhinestones from the Born Pretty store for extra detail.


I'm surprised at how dark Indigo wound up looking - it looks purpler in the bottle. But oh well, the effect is still cool.


It looks like fire! Thanks for reading :)

Thursday, May 30, 2013

Snow Globe Skittles

Welcome to another Throwback Thursday! These nails are a little messy, but that just shows how far I've come since then. But I love how the glitter looks here anyway.


Starting with my thumb, the green is OPI in Gargantuan Green Grape, glue is Essie is Coat Azure, Purple is ORLY in Frolic, yellow is Sally Hansen Xtreme Wear in Mellow Yellow, and lilac is Essie in Lapiz of Luxury. They're all topped with a coat of China Glaze Snow Globe.

Thanks for reading :)

Thursday, May 2, 2013

Throwback Thursday: Nude Glitter Gradient

Sorry for the late post today! I was in the library for most of the day working on an essay. Ugh, finals crunch time is not fun. But anyway, I have another Throwback Thursday for you! It features one of my favorite quick nail art techniques - glitter gradient.


I used a base of Nite Owl by ORLY, which is a really lovely nude with silver shimmer, and used a makeup sponge to add a gradient of Silver Dazzle by Milani One Coat Glitter.

I think black and nude is always a great combo, don't you?

Monday, April 15, 2013

Black, White, and Neon Stripes

Do you ever just love your manicure so much that you can't stop staring at it? (No? Just me? Okay...) Well this was one of those manicures.


I got the idea from a post from Kayla Shevonne. I loved it so much I decided to recreate it. I used similar colors, except instead of neon coral, I went for something even more obnoxious.


I started these nails with a base of China Glaze White on White. Then I painted half of each nail with ORLY Melt Your Popsicle, freehand. I used a medium striper nail art brush to freehand the black stripes, using the same brush to touch up mistakes where needed. And it's all sealed up with a coat of Seche Vite.


I'm pretty much in love with these nails, and I got a surprising 4 days' wear out of them before they chipped. I got a lot of compliments on them too! I really like the whole black-and-white-and-neon combo, so I'll have to do that again.

Friday, March 8, 2013

Loaded Dots

Today, I have my very first Illamasqua polish! They had a bunch of polishes on sale for only 5 pounds. I only picked one out, and I decided to go with one that I'd heard other bloggers rave about: Load, an off white creme (Illamasqua really likes pushing the envelope with their names).


Load applied very well, and it was even in two coats. Of course, plain nails just seemed a little too tame for me, so I added some dots. The dark blue is China Glaze First Mate, the gray blue is China Glaze Sea Spray, and the gold is ORLY Rage.


Simple, but quite pretty if you ask me!

Friday, February 15, 2013

Neon Puzzle Pieces

I have some really fun nail art for you today - neon puzzle pieces! I'm quite proud of how these came out. And as an added bonus, they're really bright, which is just how I like my nail polish.


There are more pictures than usual, so you can see the rest after the jump :)

Wednesday, January 30, 2013

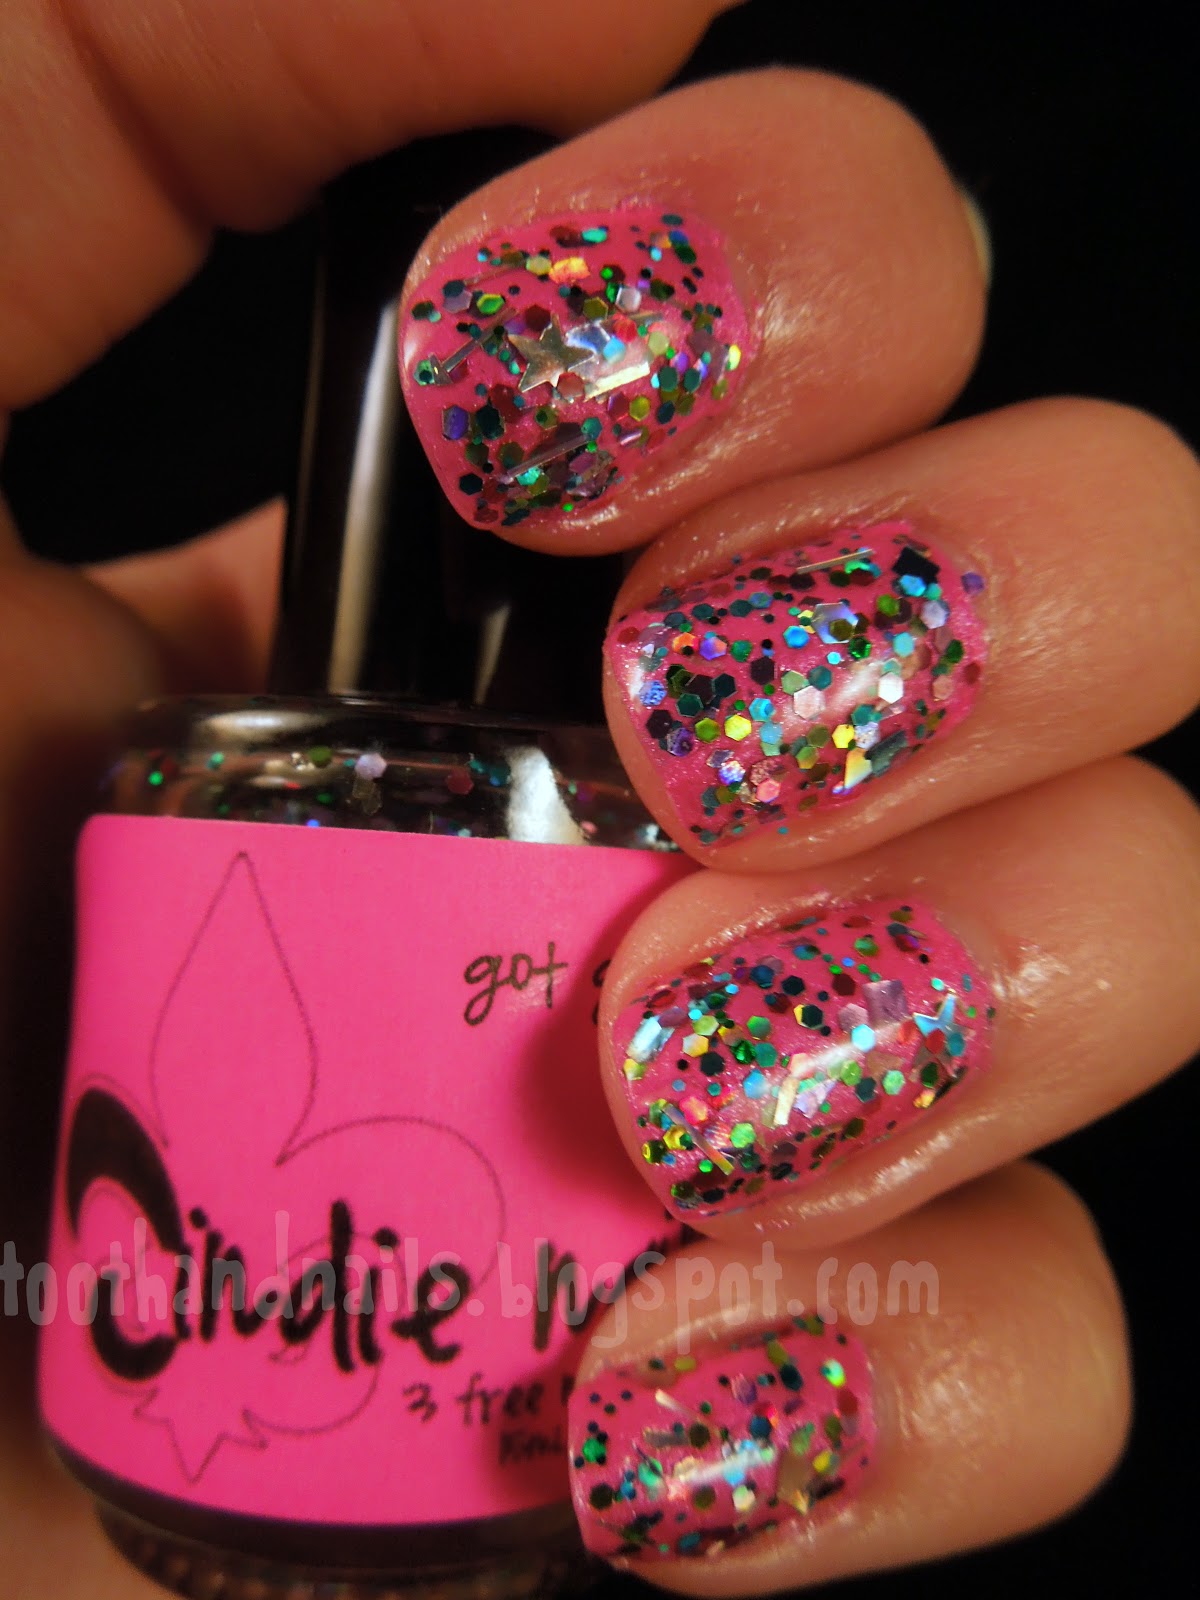
Jindie Nails: Got Glitter?

I have to say, I love me some glitterbombs. I recently made my first purchase from Jindie Nails, and it included the lovely glitterbomb, Got Glitter?


Got Glitter? is a mix of lots of different glitters in a clear base. There are hexes, bars, diamonds, squares, and even some stars in a variety of colors. Some of the glitters are holo which really makes this glitterbomb special.


The glitter was quite dense; this is two coats layered over ORLY Flirty. The glitter dispersed evenly, although the polish itself is quite thick.


Overall, I'm happy with this polish! I can't wait to try out my other Jindie polishes. Jindie Nails can be purchased from her Etsy shop.

Saturday, December 29, 2012

Dotted Christmas Trees

As I said in my last post, my original Christmas nails chipped before Christmas :( Of course, I couldn't have chipped nails for the holiday, so I did some new nail art.


I'd seen some dotted Christmas trees on some other blogs, and I loved the look of them. So I tried my own!


I started with a base of ORLY Au Champagne, a white with a soft shimmer. I used various size of dotting tools and some green polishes to make triangle shapes on each nail. The greens I used were China Glaze Glittering Garland, China Glaze Running in Circles, and Sinful Colors Exotic Green. I added some red "ornaments" using China Glaze Hey Sailor. Then I topped each tree with a dot of Sinful Colors Pull Over for a star.


I think this design is easy enough for nail art beginners to do if they're looking for a holiday look, but it's still really cool! I love the abstractness. It feels artsy :)

Thursday, December 20, 2012

Snowman Nails

As of yesterday, I am officially on winter break! I have lots of unpacking to do, but I'm home :) In honor of the occasion, I have some wintery nail art.


Isn't the snowman cute? I decided to just do an accent nail, and I made the other nails look like snowy skies. For those, I started with a base of China Glaze Frostbite. Then I used a dotting tool and ORLY Au Champagne to make some snowflakes, and I topped that off with a coat of China Glaze Snow Globe.


For the snowman nail, I again started with a base of China Glaze Frostbite. I used ORLY Au Champagne and a dotting tool to make two circles for his body and head. I used a small striping brush and China Glaze Chocodisiac for his arms, Sally Hansen Xtreme Wear Sun Kissed for his nose, and Sally Hansen Xtreme Wear Black Out and China Glaze Hey Sailor for his hat. The eyes, mouth, and buttons were also done with a dotting tool. I added a coat of China Glaze Fairy Dust for some sparkle!


I'm totally pleased with how these came out. They're wintery, festive, and fun!

Friday, October 5, 2012

Day 6: Violet

Happy Friday! Today's theme is violet. I had been meaning to try out that spun sugar technique, but I knew it would take a lot of time. So I finally had a nice chunk of time (and no pressing assignments to do), and I gave it a shot. And oh my gosh, I love it.


To do the spun sugar technique, you essentially put a blob of polish on a plate and use a dotting tool to swirl it around until it gets a little tacky. Then you dip the dotting tool in and pull it out slowly. If the polish is the right consistency, you'll be able to pull up strings of polish. Then you lay your nail next to the blob of polish and transfer the little strings right on. I decided not to put any top coat on since I like how 3-D it looks!

It's hard to explain how to do this in words, but there are lots of YouTube tutorials! Just search for "spun sugar nails tutorial" or something similar.


I took about a billion pictures, so you can see more after the jump!