Thursday, March 28, 2013

Throwback Thursday: Mint Flowers

I recently discovered a bunch of old nail photos on my computer, so I'm starting a new thing on Tooth and Nails: Throwback Thursday! Every Thursday I'll post an old photo. The photography might not be the best, and the nail art might be a bit messy, but I think they're worth sharing :) Let me know what you guys think!

The first Throwback Thursday will be one of my rare Konad manicures.


I used a base of Sinful Colors Mint Apple, then I used Konad Special Polish in White to stamp on the floral pattern. The pattern comes from one of the Konad image plates, but I can't remember which one.

That concludes my first Throwback Thursday! Hope you enjoyed it :)

Tuesday, March 26, 2013

Once in a Blue Half Moon

I bought my first GOSH polish! I picked up a silver holo and one called Galaxy, an interesting bronzey sort of color. So I decided to do some nail art with it!


I started with a base of Sally Hansen Xtreme Wear in Pacific Blue. Then I waited for that to dry before using some paper reinforcement stickers to block off the half moons at the top. I used a coat of GOSH Galaxy and sealed it all with Seche Vite.


This is better than my last attempt at a half moon mani, if I do say so myself. Practice makes perfect.


I think half moon manicures work well with little nubbin nails, so I'll keep that in mind next time mine break.

Saturday, March 23, 2013

Gold Glitter on Navy Gradient

I'm currently on spring break until April 7th! I'll be travelling around Europe, so until then I have a bunch of stuff schedule for you. It'll be like I was never gone ;)

If you ask me, you can never go wrong with a simple glitter gradient. Which is good because I was in a bit of a nail art rut - I attribute it to my relatively small collection of nail polish that I have with me in England. Sigh, study abroad problems. Oh well! I like what I came up with.


I started with a base of China Glaze First Mate, a navy creme and a one-coater. Then I used a makeup sponge to add a gradient of China Glaze Champagne Kisses, a fine antique gold glitter.


I don't know why the glitter on my middle finger looks so sparse in these photographs. It didn't look like that in person!


Studying abroad is a lot of fun, but part of me can't wait to be reunited with my polish :)

Wednesday, March 20, 2013

Pirate Polish: Companion Polish

Today I have a very unique polish to show you! It's called Companion Polish by Pirate Polish, based on the Companion Cube from the game Portal. I've never played the game, but I hear it's pretty good. Anyway, the polish:


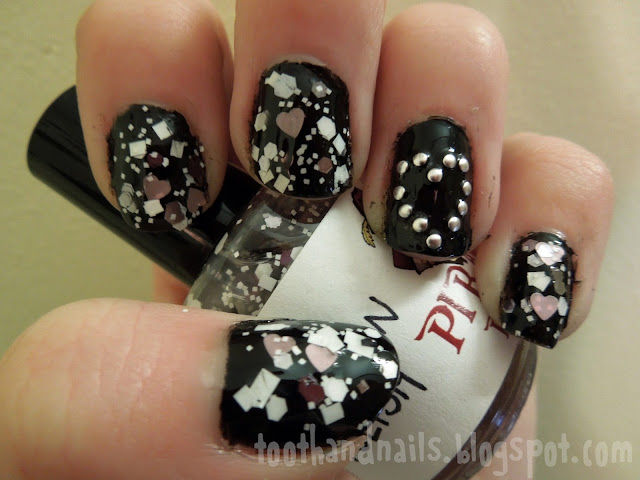
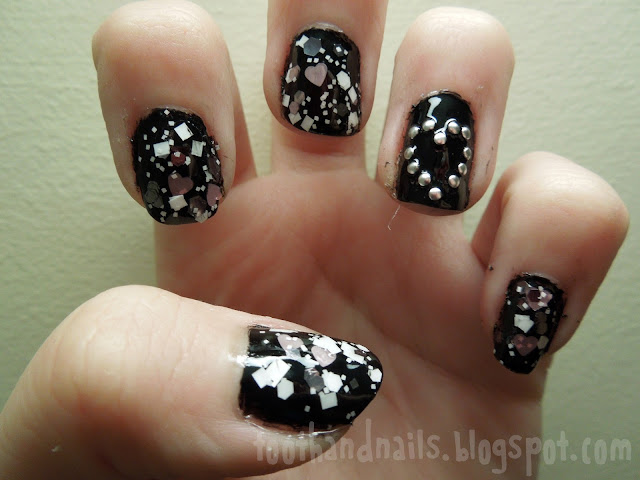
Companion Polish is a glitter topcoat: tiny white squares, big white squares, white hexes, silver hexes, and translucent pink hearts. The square glitter and the addition of the really metallic silver glitter really set it apart from my other heart glitter polishes.


I used just one coat of Companion Polish over China Glaze Liquid Leather. As you can see, it's really glitter dense! I had to do some dabbing to get everything to disperse evenly, but it wasn't particularly difficult to work with.


I also wanted to do an accent nail, so I added some round silver studs in a heart shape to my ring finger.


I'm really pleased with this polish, I just have to figure out what else to layer it over! You can purchase Pirate Polish from their Etsy store, and you can purchase the studs from the Born Pretty Store.

Saturday, March 16, 2013

Glitter Accent Fishtails

I tried a new (for me) type of manicure today: the fishtail. Also known as a braided mani. Either way, it's simple to do and looks awesome. (Side note: these are the last of the iPhone photos! I got another new camera - same model as last time. But this time it's red!)


I followed a tutorial from Lucy's Stash, which you can find here, because explaining this in words will be difficult. But basically, you paint your nails a base color, and then you paint overlapping diagonal stripes. You use 3 colors total. It's really easy, it just takes a bit of patience! It's also best to use colors that are pretty opaque so you don't have to go over each stripe a million times.


The colors I used are Sally Hansen Xtreme Wear in Mellow Yellow and Sun Kissed, and Milani One Coat Glitter in Purple Gleam. It's all sealed with a coat of Seche Vite, as usual.


I really like the fishtail technique! I'll definitely be doing it again. It's an easy way to incorporate several colors into your mani which is always a plus. It also makes a great accent nail if you don't have the time or patience to do a full mani.

Tuesday, March 12, 2013

Black Knight Stripes

Over Christmas Break, I purchased a polish that had been a lemming of mine for a while: Black Knight by Butter London. Their polishes are a bit expensive for my tastes, but I had a discount coupon at Sephora and went for it. And I'm glad I did!


Black Knight is a rainbow of glitters in a black base, with the dominant colors being pink and blue. I decided to do some nail art with it.


For the glitter nails, I used one coat of Black Knight over a base of China Glaze Liquid Leather. Black Knight can definitely reach full opacity on its own, but I like conserving polish. For the striped nails, I started with China Glaze Concrete Catwalk, then I freehanded stripes of Black Knight. I sealed it all with some Seche Vite, and that's it!


I'm glad I decided to splurge on this polish :) I just can't get enough glitter.

Friday, March 8, 2013

Loaded Dots

Today, I have my very first Illamasqua polish! They had a bunch of polishes on sale for only 5 pounds. I only picked one out, and I decided to go with one that I'd heard other bloggers rave about: Load, an off white creme (Illamasqua really likes pushing the envelope with their names).


Load applied very well, and it was even in two coats. Of course, plain nails just seemed a little too tame for me, so I added some dots. The dark blue is China Glaze First Mate, the gray blue is China Glaze Sea Spray, and the gold is ORLY Rage.


Simple, but quite pretty if you ask me!

Monday, March 4, 2013

Barry M Croc Nail Effects

Well guys, it seems like I have pretty bad luck with cameras. If any of today's photos look bad, I apologize. I had to use my iPhone because my Nikon Coolpix (yes that's right, the one I just got in November) was stolen from my locker in a London hostel :( I still have my big DSLR, but since I don't have a macro lens for it, I don't use it for blogging. Travel insurance should reimburse my losses (I also had my iPod stolen), and my new camera is on its way from Amazon now. Oh well, lesson learned: Never leave anything valuable in a hostel, even if it's in a locker!

On to the polish. Today, I have some English polish for you! I haven't bought too many new polishes since I arrived in England, but I hadn't seen anything like this one before, so I decided to try it out. It's by Barry M Cosmetics, and it's called Croc Nail Effects. They had another color, but I went for the black. It's basically just like crackle polish, but it produces a different effect.


I started with two coats of China Glaze Purple Panic since I like how neon pops against black. I then applied the Croc Nail Effects to three fingers (the bottle advises to apply a thin coat while polish is still slightly wet). It takes longer for the croc effect to show up than it does for crackle. Like crackle polishes, it has a bit of a learning curve. And like it says, make sure it's a thin coat. I put too much on my thumb on the first go, and it didn't do very much. I wound up doing that finger over with a thinner coat of croc effect.


For some fun accent nails, I used a medium striper brush to freehand some tiger stripes and regular stripes, and I used a dotting tool for the dots.


Here's a close up of the croc effect. Sorry for the messiness; I don't have all of my cleaning tools with me in England (read: I only have nail polish remover instead of acetone)! 


Overall, I think the effect is interesting, but I wish it allowed you to see more of the base color. It's very black. I'm glad I chose to do some accents nails to brighten up this mani.